Farmstead

“Some blazing malevolence from beyond the stars has crashed upon the Miller’s farm. Lands that have, in past years, yielded rich harvests are now sown with a new and terrifying seed—an unrelenting crystalline consumption that inches outward from the mill with each passing season.”
Some hateful shard of alien origin has streaked through the night sky, crashing into the old Miller’s farm on the outskirts of the Hamlet! Those unfortunate enough to witness the Comet’s arrival have been blinded by what they can only describe as a shifting, ephemeral hue of damnably abrasive intensity. There has been no word from the farm in a fortnight, save for the unearthly groaning that echoes from the ruin of the mill…
Ever since the Comet struck the Old Windmill, the Farmstead and its surrounding acres of land have been severely altered by the otherworldly corruption. As if the natural flow of time has been distorted beyond recognition, once fertile fields are a lifeless wasteland where only crystallized wheat and mutated pumpkins can grow, and the acres are littered with the fossilized remains of people, livestock, and petrified crops, as if they have aged uncountable years in a blink of an eye. Even the stars above the Farmstead are not right; none of the recognizable constellations can be seen in the night sky, and the Northern Star is in the wrong position, as if these night skies are not from this time and place.
The only reason why this new source of evil and corruption have not infected the Estate is because of the Enchanted Warding Stones on the perimeter of the Farmstead keep this new Evil contained, but like all things, it is only a matter of time before the barrier is pierced by this Terror from the Stars.
Behavior
The Farmstead is a new location that is introduced in the Color of Madness DLC. It is unique in the fact that it eschews exploration for pure combat - When you enter, you are pitted against a constant stream of monsters, new ones coming in to take the place of the old. The first two missions act as a tutorial to the main draw of the place - An: endless mode, where you are pitted against wave after wave of monsters until you are defeated or you flee.
The Farmstead differs from the other areas of the game in a number of ways.
- Enemy corpses, if ignored, become large crystal formations. If these are left alive, they explode for HP and Stress damage.
- The torch does not fade over time but instead takes a multitude of different variants.
- There is no negative consequence to fleeing from the battle, other than losing out on the level's bonuses.
- In the endless mode (after the first 2 farmstead missions), death is temporary. If a character dies, they become lost in time and space, only to eventually reappear after a week or two - This is functionally identical to the way adventurers can go missing after participating in Stress Relief. However, be wary as losing a character will cause their trinkets to be lost as well until you are able to retrieve them eventually from the Shrieker.
- Also upon dying/lost any Prismatic Quirk will be removed from said hero and be added back onto The Thing from the stars list.
- Losing all characters to a run will cause all shards and any/all drops to be lost as well.
- Camping is only initiated through the Miller's Hearth, meaning one will have to work for a camp.
- One inventory slot is taken up by a single quest-like item: Memory. This cannot be discarded, and serves to provide some lore, along with a slight splinter in terms of inventory management.
Lighting Effects
Heroes will travel through a multitude of dimensions, past, present, or future, with specific enemies from each region, even the last one. Each fight will bring an alternation between dimensions. When in the Farmstead, the lighting will be the Farmstead's Miasma, and when between dimensions, the light will be randomly selected at the beginning of a wave.
For trinkets and quirks, like the courtyard, the light level is considered to be 100.
| Lighting Effects | ||
|---|---|---|
| Lighting Name | Hero Effects | Monster Effects |
|
None | |
|
| |
|
| |
|
| |
|
| |
Reflections
Once the player has progressed beyond 200 kills, the shimmering space-time of the corrupted Farmstead takes on an endgame condition, called a "Reflection". These are mutators that increase the difficulty of the quest in different ways from that point onward. These conditions stack on top of any other light conditions that are already present in the Farmstead or in space and time.
| Reflections | ||
|---|---|---|
| Reflection Name | Hero Effects | Monster Effects |
| Unbearable Reflection |
|
|
| Reflection of Decay |
|
|
| Sanguine Reflection |
|
|
| Reflection Obscura |
|
|
Strategy
| "...it must be at least 10,000 years old, or maybe not? Who can say?" ~ Antiquarian This article or section contains information that may be out of date.
|
General
The Farmstead works in waves: you'll need to fight a specific amount of monsters in order to spawn the Sleeper's Dream and end the fight. Note that there must be an open enemy slot for the Sleeper's Dream to spawn. It always acts first in the round and always uses "Beyond Time and Space" to teleport the party to a room. The safe rooms will prioritize your team's biggest needs (though not always the one you want) during the first three full sections by either reducing stress or healing. Before The Miller fight is your first chance at a Camp. After The Fracture/The Sleeper fight curios become much rarer to encounter.
When you kill a monster and remove the corpse, 2 turns later others will replace it. This will be triggered on the first kill, if you kill any others after this one, whether next turn or not, all open slots will be filled at the same time. Again and again, until the next kill threshold is reached. Corpses that remain standing will be replaced by a Crystalline Aberration on the next turn. Large corpses will be replaced by two.
This is why you shouldn't rush for kills, it's better to move forward by killing two enemies at a time in order to contain the fight. You should prioritize killing stress dealers, as stress will be harder, in the long run, to deal with than raw damage. Damage dealer enemies should be Stunned or Debuffed and killed last if possible, doing the opposite works if one hero is on the verge of death. Stack bleed/s and blight/s and heal yourself as often as possible. when you are near the kill quota, you can rush for kills. Once you reach the threshold (and there is an open slot for the Sleeper's Dream to spawn), there is no need to kill the remaining enemies as you will be teleported away. Therefore, it's not important to attack enemies past this point (unless you are in real danger of taking a deathblow or stress damage), and now would be the time for buffing and healing your heroes until the Sleeper's Dream appears.
The meter at the top right corner of the screen increases with each wave of enemies killed, after the last wave, you will encounter a Boss. The first two bosses are set: first The Miller, then The Sleeper. For later waves, the boss is chosen randomly from a pool, which includes the Thing From The Stars, the Shambler, the Crocodilian (even if Crimson Court DLC is/isn’t installed) the Shrieker, the Collector, the Swine God, the Flesh, the Necromancer, the Prophet, the Hag, the Brigand Pounder, the Siren, the Drowned Crew, and Brigand Vvulf (only if Wolves at the Door mission is completed). Additionally, the Fracture can appear again.
Pay attention to which kind of light is active and which area you appear in, act accordingly. For example, when you reach the yellow light (Splendorous), it can be worth letting heroes cross the Affliction limit, as you have a 5% increased chance to get a virtuous hero. This does not guarantee one, however, and bear in mind that virtues are cleared by reaching 200 stress.
In the Farmstead, skills that have limited uses per battle (such as Leper's Revenge, Plague Doctor's Blinding Gas or Jester's Finale) do not refresh their usage until the end of the certain group of waves (after the boss battle) instead of refreshing after each wave. You may consider keeping these skills only for bosses, or refresh them with the Shard Dust, although it comes at the cost of stress and irremovable debuffs. The notable exception is Abomination's Transform, which does refresh after each wave.
Even if you have The Crimson Court (DLC), you will not see any enemies from the Courtyard (except Crocodilian). However, enemies from the Darkest Dungeon itself may sometimes appear.
Provisions
There is no need to bring Torches, or Shovels here. Food is required for camping at the Miller's Hearth curio on Veteran and Champion missions; camping is not available during the Apprentice mission.
Bring any combat items (Bandage, Antivenom, Medicinal Herb, Skeleton Key, Holy Water and Laudanum) you think you will need—with the new buildings, many of these items now provide significant resistance buffs as well.
You will never receive The Blood as a reward from any fight or curio, making it more dangerous to bring heroes affected by the Crimson Curse, at least if you intend to continue beyond The Sleeper.
Party Composition
The choice of party compositions is affected by the overall goal of the expedition. If the goal is merely to kill The Sleeper to farm Memories, then many easily accessible compositions will work. However, surviving beyond 500-1000 kills will require more planning.
The Endless Harvest is a matter of endurance, meaning that maintaining your party's overall health and stress will be paramount for a long run.
- Firstly, you'll need a good healer. A good Vestal will do the job, Divine Comfort being a great counter to the Miller's Reaping. Although the Occultist can heal an enormous amount, he is a far riskier choice as a primary healer.
- Secondly, heroes with stress heal skills are very helpful. For example, the Jester with Inspiring Tune and the Flagellant
 with Endure have an incredible synergy. With the Dirge For The Devoured on the Jester and the Aria Box on the Flagellant, you can easily heal over 30 stress per turn.
 - Limited-use skills such as the Jester's Finale or Flagellant's Exsanguinate will not be refreshed until the end of the entire group of waves - that is, after reaching the crystal at the end of the wave meter (a boss at all except the first time) and not the brief rest rooms between. Parties which rely on these skills for normal progression will be difficult to manage.
- Lastly Accuracy should be prioritized on damage dealers (Bleed/Blight/Stun) to avoid a miss that would otherwise end your run as many times monsters will repeatedly focus fire one hero putting your team in danger.
- As in the rest of the game, DODGE comps are a slow, but highly effective composition, able to survive almost indefinitely (with tens of thousands of kills) in the Farmstead.[1]
- An easily accessible early-game composition would be Vestal / Jester / Shieldbreaker / Shieldbreaker. The Shieldbreakers' flexibility, along with the support from Jester and Vestal, can handle waves up to the Sleeper, but may run into issues afterwards.
- In the endless mode, stress is a bigger threat than HP damage. Therefore, it is advised to use heroes with - stress% quirks, equip - stress% trinkets, or kill your enemies fast.
- Highwayman's Crimson Court trinkets effect can turn stress damage into your advantage if his virtue can proc. (basic 25% + 45% from trinkets = 70%)
Any corpses left will become a Crystalline Aberration on the next turn. While you will receive a minor healing effect for destroying them, it is important to destroy them quickly or remove corpses before they can turn in order to avoid their explosive attacks. A good solution is to use bleed skills (Blight can be an alternative, but you will encounter many Farmstead monsters on this quest that all have very high Blight resistance).
This will allow you to quickly remove the corpse, and it's an excellent way to neutralize enemies in order to heal yourself.
Nevertheless, keep in mind that you will likely encounter Ruins enemies during the quest who are incredibly resistant to bleed. Balance your strengths, (2xBlight, 1xBleed, 1xHealer), (2xBleed, 1xBlight, 1xHealer) or (1xBlight, 1xBleed, 1xRaw Damage/1x CC support, 1xHealer) for example.
It's important to have well-chosen camping skills. Since fights last very long, combat buffs are welcome. As you can quickly contract diseases (especially against Warrens and Cove monsters), skills that can remove them (like the Grave Robber's Snuff Box) are perfect. As mortality debuffs from the Death Door recovery stack, skills which remove them are particularly useful here.
You will not need scouting or ambush prevention skills, you cannot be ambushed on Farmstead quests.
List of Farmstead Monsters
| Enemies found within the Farmstead | |||||||
|---|---|---|---|---|---|---|---|
| Enemy | HP | DODGE | PROT | SPD | Type | Resistances | Abilities |
 Farmhand |
12 | 8 | 0% | 2 | Husk Human |
|
Ceaseless Labor |
 Foreman |
26 | 0 | 15% | 3 | Husk Human |
|
Stir the Rabble |
 Scarecrow |
12 | 15 | 0% | 6 | Husk |
|
Haunting Revelation |
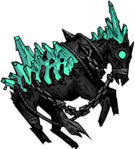 Plow Horse |
20 | 5 | 15% | 7 | Husk Beast |
|
Trample |
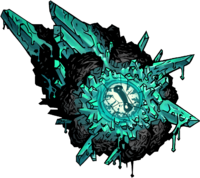
 Crystalline Aberration |
5 | 0 | 0% | -4 | Husk |
|
Unstable Resonance |
 Sleeper's Herald |
11 | 20 | 45% | 3 | Husk |
|
Reality Bend |
 Sleeper's Dream |
Husk |
|
Beyond Space and Time | ||||
 Miller |
181 | 6 | 20% | 6 | Poor Soul |
|
|
 Frozen Farmhand |
35 | 0 | 35% | 3 | Husk Human |
|
Hollow Keening |
 Fracture |
115 | 20 | 0% | 6 | Husk |
|
|
 Focus Point |
Husk |
|
None | ||||
     Unfinished Aberration |
Husk |
|
None | ||||
     Finished Aberration |
Husk |
|
Eternal Blossom: | ||||
 The Sleeper |
Husk |
|
The Sleeper Awakens | ||||
| Random Bosses Pool | |||||||
|---|---|---|---|---|---|---|---|
| Enemy | HP | DODGE | PROT | SPD | Type | Resistances | Abilities |
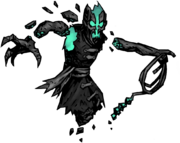
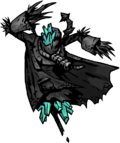
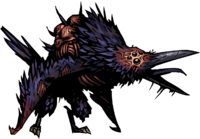
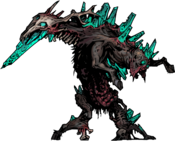 Thing From The Stars |
106 | 5 | 0% | 2 | Eldritch |
|
Phase Gnaw
|
 Shambler |
77 | 0% | 33% | 0 | Eldritch |
|
Obdurous Advancement |
 Shambler Tentacle |
8 | 17.5% | 0% | 10 | Eldritch |
|
Clapperclaw |
 The Collector |
70 | 0% | 0% | 5 | Human Eldritch |
|
Show Collection |
 Collected Highwayman |
16 | 7.5% | 0% | 3 | Eldritch |
|
Headhunt |
 Collected Man-at-Arms |
16 | 7.5% | 0% | 7 | Eldritch |
|
Head Games |
 Collected Vestal |
16 | 7.5% | 0% | 5 | Eldritch |
|
Headstrong
|
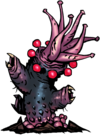
Prophet |
105 | 5% | 0% | 0 | Unholy |
|
Calamitous Prognostication |
 Small Pew |
25 | 0% | 0% | 0 | Carpentry |
|
None |
 Medium Pew |
40 | 0% | 0% | 0 | Carpentry |
|
None |
 Large Pew |
55 | 0% | 0% | 0 | Carpentry |
|
None
|
Swine Prince |
132 | 0% | 0% | 0 | Beast |
|
Obliterate Body |
 Wilbur |
17 | 15% | 0% | 20 | Beast |
|
Bit 'o Squeal
|
 Brigand Vvulf |
160 | 25% | 0% | 4 | HUMAN |
|
Bombs Away |
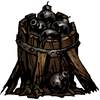 Barrel O' Bombs |
25 | 0% | 0% | 0 | CARPENTRY |
|
None, but always has Riposte |
 Shrieker |
75 | 40% | 0% | 7 | ELDRITCH BEAST |
|
Peck |
 Shrieker's Nest |
60 | 0% | 0% | 0 | THATCHERY |
|
None
|
 Crocodilian |
118 | 10 | 10 | 7 | BLOODSUCKER |
|
Swarming Corruption |
 Bulrush |
100 | 200 | 80% | 0 | VEGETATION |
|
None. |
 Cattail |
100 | 200 | 80% | 0 | VEGETATION |
|
None. |
Curios
Farmstead Curios
| Curios found within the | |||||||||||
|---|---|---|---|---|---|---|---|---|---|---|---|
| Curio & type | Description | Cleansing | Without cleansing | ||||||||
|
"Glittering crystals spill onto the ground."
(This curio can only appear inside rooms.) |
|
| ||||||||
|
"Tantalizing provisions to renew a body.
(This curio can only appear inside rooms.) |
|
| ||||||||
|
"Useful supplies for this harrowing journey."
(This curio can only appear inside rooms.) |
|
| ||||||||
|
"Take up the hatchet. Blow off some steam."
(This curio can only appear inside rooms.) |
|
| ||||||||
|
"The fireplace is slowly coming apart but looks functional."
(This curio can only appear inside rooms.) |
|
| ||||||||
|
Take up the axe. Blow off some steam.
(This curio can only appear inside rooms.) |
|
| ||||||||
|
"Tantalizing provisions to renew our energies."
(This curio can only appear inside rooms.) |
|
| ||||||||
|
"This anguished creature does not seem hostile, yet."
(This curio can only appear inside rooms.) |
|
| ||||||||


References
| view | |
|---|---|
| Hub | Hamlet |
| Dungeons | Old Road |
| DLC Locations | Courtyard |