| Apprentice Level | |||||||||
|---|---|---|---|---|---|---|---|---|---|
| Skill Name | Range | Rank | Target | Accuracy | Crit Chance |
Damage | Effect (Target) |
Effect (Self) |
Notes |
| Return to the Stars | Ranged | 1,2,3,4 | 1+2+3+4 | 202.5% | 0% | 0 | |||
| Phase Gnaw | Melee | 1,2,3,4 | 1,2 | 92.5% | 2% | 3-5 Armor Piercing |
|||
| Vorpal Strike | Melee | 1,2,3,4 | 1,2,3,4 | 97.5% | 10% | 6-9 | |||
| Paralysing Shard | Ranged | 1,2,3,4 | 1,2,3,4 | 97.5% | 6% | 1 | |||
| Weakening Shard | Ranged | 1,2,3,4 | 1,2,3,4 | 102.5% | 6% | 1 | |||
| Transfixing Shard | Ranged | 1,2,3,4 | 1,2,3,4 | 97.5% | 6% | 1 | |||
Thing from the Stars
Jump to navigation
Jump to search

| ||||
| Enemy Type | Eldritch | |||
| Size | Large (2) | |||
| Actions per round | ||||
| Stats | ||||
| Variation | Thing from the Stars |
Thing from the Stars |
Thing from the Stars | |
| HP | 106 | 148 | 191 | |
| HP (Stygian/Bloodmoon) | 128 | 178 | 230 | |
| Dodge | 5 | 13.75 | 25 | |
| Protection | 0 | 0 | 0 | |
| Speed | 2 | 3 | 4 | |
| None | None | None | ||
| Resistances | ||||
| 85% | 105% | 125% | ||
| 40% | 60% | 80% | ||
| 33% | 53% | 73% | ||
| 40% | 60% | 80% | ||
| 25% | 45% | 65% | ||
| “ | A shard of alien malignity! | „ |
| ~ The Ancestor |
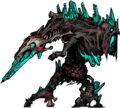
The Thing from the Stars is a Eldritch miniboss from The Color of Madness DLC. An extremely dangerous opponent, the Thing has multiple actions per round and is capable of inflicting massive Stress damage and Blight in a short amount of time. Perhaps its most notorious ability is its second phase—when the Thing reaches low health, it gains a series of buffs that make it highly resistant to direct damage, while simultaneously boosting its offensive power.
The Thing wanders randomly from dungeon to dungeon each week—when embarking, an icon will appear on the minimap indicating the dungeon where it is currently patrolling.
Spawn Mechanics
The Thing from the Stars will not appear until the first expedition to the Farmstead has been completed. After that point, the Thing will begin to wander the map.
In the dungeon that it is currently patrolling, the Thing has a 50% chance to spawn on any Expedition, including boss expeditions, as an extra hallway battle. If a hallway is scouted which contains two battles, then it is highly likely, but not guaranteed, that one of them is the Thing. Furthermore the Thing can only spawn when the map is generated; a newly generated battle that appears when re-entering a hallway will not contain the Thing.
The Thing does not patrol the Courtyard or the Darkest Dungeon; however, it may (fittingly) appear as a random boss in the Farmstead.
Behaviour
In a large part, the encounter with the Thing from the Stars is defined by Return to the Stars, an Auto-Action (free action) that it uses at the beginning of every round starting from the second round onwards. Return to the Stars summons a Crystalline Aberration, inflicts Stress on the entire party, cures the Thing of Blight and Bleed, deals a small amount of damage to the Thing itself, and applies a number of very powerful ![]() Buffs to the Thing for the remainder of the battle:
Buffs to the Thing for the remainder of the battle:
 If HP below 45%:
- +80% PROT
- +6 SPD
- +40% DMG
- +13% CRIT
Note that Return to the Stars, being a free action, does not trigger Bleed or Blight damage before curing them.
After Return to the Stars, the Thing has two regular actions per round. All of the Thing's attacks inflict significant Stress damage on the target. Vorpal Strike and Phase Gnaw are its primary damaging attacks:
- Vorpal Strike can hit any position with high damage and CRIT chance.
- Phase Gnaw can only hit the first two ranks and has lower direct damage, but deals a lot of Blight (the single highest amount in the game) and may also infect the hero with Sky Taint, a Disease that further lowers Blight and Bleed resistance and increases Stress received.
Additionally the Thing has a number of powerful stuns and debuffs—Paralysing Shard, Weakening Shard, and Transfixing Shard. Each of these has a 1-turn cooldown, and will never be used twice in the same round.
The Thing has an unforgiving set of targeting biases, prioritizing heroes with the lowest stun resistance with Paralysing Shard and stressed heroes with Phase Gnaw.
Strategy
Dealing with the Second Phase
The primary challenge when fighting the Thing from the Stars is dealing with its second phase quickly and effectively. When below 45% health, the Thing gains a ridiculous buff of +80% PROT that, in the worst case, could make the second phase of the fight last five times as long as the first phase. This is an especially difficult prospect given the Thing's high damage and stress output. Conventionally there are two ways to approach the second phase—ignoring PROT, or reducing it.
Ignoring PROT
Damage-over-time attacks are very effective against the Thing's second phase as they ignore PROT entirely. One challenge is that Return to the Stars automatically clears all Bleed and Blight at the beginning of each round, limiting DoTs to at most two turns as opposed to the usual three. Additionally, in order to maximise DoTs characters must have enough Speed (and luck) to act before the Thing's first turn, right after Return to the Stars. In the worst case, a DoT that is applied after the Thing's second turn will deal no damage—Return to the Stars, being a free action, does not trigger the DoT before it clears it at the beginning of the next round.
One effective combination using damage-over-time attacks is the classic Flagellant-Plague Doctor pairing. Both are extremely fast and deal the most Bleed and Blight, respectively, amongst all heroes; they also have ways of dealing with the Thing's high Stress output, clearing Blight, healing, and removing Disease if necessary. This is all in addition to the two heroes' strong innate synergies, which will make clearing the rest of the dungeon easier.
Outside of Bleed and Blight, the ![]() Shieldbreaker's Pierce and Grave Robber's Pick to the Face also completely ignore PROT, allowing them to deal full damage to the Thing. One problem, however, is that both of those skills deal low damage, particularly in the early game. As an example, with a small investment of gold and trinkets, at the Apprentice level Plague Grenade can fairly consistently deal 10 damage per round to the Thing; but Pick to the Face struggles to get close to that amount. Not to mention, both the Shieldbreaker and Grave Robber have low survivability compared to other heroes. Still, solely because of their PROT piercing, they are strong options compared to other regular damage-dealers.
Shieldbreaker's Pierce and Grave Robber's Pick to the Face also completely ignore PROT, allowing them to deal full damage to the Thing. One problem, however, is that both of those skills deal low damage, particularly in the early game. As an example, with a small investment of gold and trinkets, at the Apprentice level Plague Grenade can fairly consistently deal 10 damage per round to the Thing; but Pick to the Face struggles to get close to that amount. Not to mention, both the Shieldbreaker and Grave Robber have low survivability compared to other heroes. Still, solely because of their PROT piercing, they are strong options compared to other regular damage-dealers.
Reducing PROT
Debuffs can also reduce the Thing's PROT to a manageable level. The Houndmaster's Target Whistle stands out as the most useful of these:
- It has a staggeringly high debuff chance, 130% at base—the highest in the game. This means that the debuff can be applied consistently without any additional trinket investment.
- The PROT debuff applies for four turns, one turn longer than usual. Even with the Thing's multiple turns per round, it is easy to stack the debuff, doubling its effectiveness.
- Lastly, it applies a Mark. This works well with the Houndmaster's already strong synergy with other mark-based damage dealers like the Arbalest and the Bounty Hunter.
The Shieldbreaker's camping skill, Snake Eyes, also grants all the Shieldbreaker's companions a small amount of PROT piercing. The skill is quite efficient in that it stacks with all other sources of PROT reduction and, as a camping buff, does not need to be reapplied every round.
Dodge
Since Return to the Stars deals a small amount of damage to the Thing every round, it is possible in theory to outlast the Thing until it simply… returns to the stars. In practice, however, this is quite difficult given the Thing's high damage output. One possible approach is to stack Dodge buffs (e.g. the Man-at-Arms Bolster and the Antiquarian's Invigorating Vapours), a tactic that trivialises much of the rest of the game. Note however, that Return to the Stars has extremely high accuracy, making it effectively undodgeable, and thus the party is likely to suffer a lot of Stress in the process.
Slow Stunning
Part of the challenge in fighting the Thing from the Stars lies in action efficiency—being able to constantly deal damage while at the same time preventing heroes from dying. For example, each turn Return to the Stars will summon a Crystalline Aberration that, if left alive, will self-destruct and inflict heavy Stress and damage on the party. This means that at least one hero action each round must be spent destroying the Crystalline Aberration, leaving only three actions for attacking the Thing or sustaining the party.
It is in fact possible, however, to prevent the Thing from using Return to the Stars entirely: if the Thing is stunned after its second turn, it will begin the next round stunned, thereby skipping both Return to the Stars and its first normal turn. This is extremely action-efficient, as:
- It saves the team from needing to destroy the Crystalline Aberration that would otherwise be spawned.
- It prevents the Thing from clearing damage-over-time effects, making Bleed and Blight skills more effective.
- It prevents half of the Thing's regular attacks each round (not to mention the party-wide stress from Return to the Stars), making the battle much less punishing.
The main difficulty in executing this is having a hero with low speed, but high stun chance. Speed can be manipulated by consuming The Blood, which debuffs the hero by a massive -8 speed, greatly increasing the chance that they will act after the Thing's turns. The Blood also reduces the hero's HP, allowing them to take advantage of the +40% Stun Skill Chance bonus from the Crystalline Fang—and with the Crystalline Fang equipped, many heroes can reach 200% or higher stun chance, enough to disable the Thing fairly often.
One niche strategy takes slow stunning to the extreme: since the Thing's powerful self-buffs are only applied when Return to the Stars is used for the first time, if it is stunned at the end of every round, it will never enter the second phase. This is tricky to pull off, requiring both the right skills and trinkets, and a little luck, but can make the fight much, much easier.[1]
Avoiding the Thing
From a strategic perspective, it is often better to avoid the Thing from the Stars entirely, especially during the early weeks when there are few heroes in the roster who can deal with it effectively. Fortunately, avoiding the Thing is quite easy to do—one may simply avoid the Farmstead until the roster is sufficiently developed; or, after the Thing is let loose, avoid the dungeon where the Thing is patrolling; or, barring that, avoid any suspicious-looking hallways with multiple battles.
Loot
After defeating the Thing from the Stars, you will receive 15, 20, or 25 Comet Shards alongside a randomized amount of gold. There is additionally a chance the Thing will drop one of its unique Trinkets or Ancestor Trinket. The exact chance is 1/7 (~14%) on Veteran missions, and 1/5 (20%) on Champion. There is an equal chance the Thing will drop a Memory on death instead, which is otherwise only obtainable by defeating The Sleeper. Neither will drop on Apprentice missions, but you will still get shards.
| Thing's Mesmerizing Eye | Crystalline Fang | Phase Shifting Hide | Prismatic Heart Crystal |

|

|

|

|
|
|
|
|
Prismatic Quirks
Heroes who survive the battle with the Thing from the Stars may receive one of several new quirks after the mission is over. These quirks are unique; they can only be on one hero in your whole roster. Only one hero will receive a quirk on a given mission, and gaining more requires defeating the Thing once again. They are automatically locked, and the Sanitarium will only offer the option to remove them. Removing Prismatic quirks allows them to be obtained again the next time the Thing is defeated. Facing the Thing as a boss on the Farmstead can also reward a member of your party with one of the quirks.
The following list is of the quirks in the order they can be obtained, and their effects:
| Prismatic Isolation | +25% Debuff Resist |
| Prismatic Stability | +25% Move Resist |
| Prismatic Solidity | +25% Stun Resist |
| Prismatic Coagulation | +25% Bleed Resist |
| Prismatic Purity | +25% Blight Resist |
| Prismatic Calm | -30% Stress |
| Prismatic Force | +15% DMG |
| Prismatic Speed | +3 SPD |
| Prismatic Precision | +4% CRIT |
| Prismatic Eye | +8 ACC |
| Husk Slayer | +10 ACC and +5% CRIT vs Husk |
| Scythemaster | +15% DMG vs Husk |
Abilities
| Veteran Level | |||||||||
|---|---|---|---|---|---|---|---|---|---|
| Skill Name | Range | Rank | Target | Accuracy | Crit Chance |
Damage | Effect (Target) |
Effect (Self) |
Notes |
| Return to the Stars | Ranged | 1,2,3,4 | 1+2+3+4 | 208.75% | 0% | 0 | |||
| Phase Gnaw | Melee | 1,2,3,4 | 1,2 | 98.75% | 6% | 5-6 Armor Piercing |
|||
| Vorpal Strike | Melee | 1,2,3,4 | 1,2,3,4 | 103.75% | 11% | 9-12 | |||
| Paralysing Shard | Ranged | 1,2,3,4 | 1,2,3,4 | 103.75% | 12% | 2 | |||
| Weakening Shard | Ranged | 1,2,3,4 | 1,2,3,4 | 108.75% | 12% | 2 | |||
| Transfixing Shard | Ranged | 1,2,3,4 | 1,2,3,4 | 103.75% | 12% | 2 | |||
| Champion Level | |||||||||
|---|---|---|---|---|---|---|---|---|---|
| Skill Name | Range | Rank | Target | Accuracy | Crit Chance |
Damage | Effect (Target) |
Effect (Self) |
Notes |
| Return to the Stars | Ranged | 1,2,3,4 | 1+2+3+4 | 220% | 0% | 0 | |||
| Phase Gnaw | Melee | 1,2,3,4 | 1,2 | 110% | 9% | 6-8 Armor Piercing |
|||
| Vorpal Strike | Melee | 1,2,3,4 | 1,2,3,4 | 115% | 12% | 11-16 | |||
| Paralysing Shard | Ranged | 1,2,3,4 | 1,2,3,4 | 115% | 14% | 2 | |||
| Weakening Shard | Ranged | 1,2,3,4 | 1,2,3,4 | 120% | 14% | 2 | |||
| Transfixing Shard | Ranged | 1,2,3,4 | 1,2,3,4 | 117.5% | 14% | 2 | |||
Gallery
Thing from the Stars' combat animation
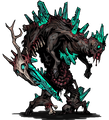
Idle stance
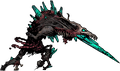
Thing from the Stars using Return to the Stars
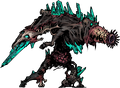
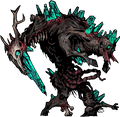
Thing from the Stars using Phase Gnaw
Thing from the Stars using Paralysing Shard, Transfixing Shard, and Weakening Shard
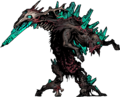
Thing from the Stars using Vorpal Strike
Thing from the Stars defending
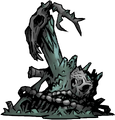
Thing from the Stars' corpse


Trivia
- It may be a reference to H.P. Lovecraft's "The Colour Out of Space." It can be seen to have incorporated the body parts of at least two small humans and a large farm animal, the same as were found in the farmstead well at the end of Lovecraft's story.
References
Categories:
- Pages using Tabber parser tag
- Bosses
- Enemies
- Eldritch
- Color of Madness Enemies