Templar Warlord
Jump to navigation
Jump to search
| Templar Warlord | |
|---|---|

| |
| Enemy Class | Eldritch/Beast |
| Size | Large (2) |
| Actions per round | |
| Stats | |
| HP | 105 |
| HP (Stygian/Bloodmoon) | 126 |
| Dodge | 28.75% |
| Protection | 0% |
| Speed | 6 |
| No | |
| Resistances | |
| 97.5% | |
| 97.5% | |
| 67.5% | |
| 67.5% | |
| 98% | |
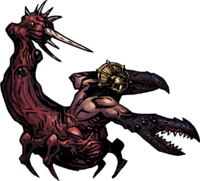
The Templar Warlord is a miniboss which guards the altars in the second quest in the Darkest Dungeon. He takes 2 actions per turn, one of which is typically a Revelation attack. His other action will be spent on one of his remaining attack abilities.
Strategy
- Bringing all 3 Talismans of the Flame is required in order to survive this fight. Your party member who is left unprotected from the devastating Revelation should be guarded by a MAA or Houndmaster. Alternately an Antiquarian can be brought without the trinket and she can use "Protect Me" skill to make another unit guard her.
- You'll also want to bring a lot of Antivenom - the Warlord can apply heavy blight. Similarly, Holy Water can help prevent you from being blighted in the first place.
- When fighting the double Templars, it would be recommended to focus down this one first, as it is the one with the less amount of HP.
- If you manage to stun them after each Revelation attack, you can really minimize the amount of damage they deal to almost none if the Revelation lands on a protected hero.
Team Selection
Preferred Heroes
- Man-at-Arms - Long-lasting Guard can defend the one vulnerable hero. Bolster is always a good inclusion for the fights.
- Houndmaster - Can Guard the vulnerable hero. Hound's Rush does massive damage to the Templars and their companions. For the intermittent fights, relieve the party's Stress with Cry Havoc
- Flagellant - Very durable unit who can hold out through the three fights. Can bring out massive heals and provide Stress relief. You can even leave him as the one hero without the Talisman, as Eternity's Collar can raise his damage output when he's at high Stress.
- Occultist - Bonus damage to the many Eldritch enemies in this fight. Can deliver massive heals to whoever's Guarding.
- Vestal - There's a lot of damage going about. Reliable healing will be helpful.
Reasonable Choices
- Jester - Can spread Bleeds about the enemy formations and relieve Stress when needed.
- Plague Doctor - Battlefield Medicine to cure any Blight your heroes take.
- Leper - Massive raw damage speeds up the progress of the fight. Be wary of movement from the other enemies.
- Antiquarian - If you're missing heroes who can Guard, use her to force someone to take the hits for her. However, her actual combat ability is not that strong, so you'll be in for a long fight.
- Bounty Hunter - Use Planned Takedown to raise his damage against the large Templars. He's perfectly workable in position 3 if your frontline gets crowded.
Abilities
| Darkest Level | |||||||||
|---|---|---|---|---|---|---|---|---|---|
| Skill Name | Range | Rank | Target | Accuracy | Crit Chance |
Damage | Effect (Target) |
Effect (Self) |
Notes |
| Torment | Melee | 1, 2, 3, 4. | 1+2. | 103.75% | 7% | 8-17 | No Effect | No Effect | |
| Stinger Shot | Ranged | 3, 4. | 2, 3, 4. | 113.75% | 17% | 12-17 | No Effect | ||
| Doomsday | Ranged | 3, 4. | 1+2+3+4. | 113.75% | 7% | 5-8 | No Effect | ||
| Revelation | Ranged | 1, 2, 3, 4. | 1, 2, 3, 4. | 123.75% | 0% | 16-26 | No Effect | ||
Related Enemies
All Areas
The Darkest Dungeon
- Ascended Brawler
- Ascended Witch
- Rapturous Cultist
- Cultist Priest
- Templar Impaler
- Templar Gladiator
- Templar Sniper
Gallery


