| Apprentice Level | |||||||||
|---|---|---|---|---|---|---|---|---|---|
| Skill Name | Range | Rank | Target | Accuracy | Crit Chance |
Damage | Effect (Target) |
Effect (Self) |
Notes |
| All Hands on Deck! | Melee | 1, 2, 3, 4. | 2, 3, 4. | 102.5% | 0% | 0 | No Effect | ||
| Mutiny | Ranged | 1, 2, 3, 4. | 2, 3, 4. | 82.5% | 0% | 1 | No Effect | ||
| Drink with the Dead | Ranged | 1, 2, 3, 4. | 2, 3, 4. | 82.5% | 0% | 1 | No Effect | ||
| Boarding Clutch | Ranged | 1, 2, 3, 4. | 1, 2, 3, 4. | 82.5% | 2% | 3-7 | No Effect | ||
Drowned Crew
Jump to navigation
Jump to search
| Drowned Crew | ||||
|---|---|---|---|---|

| ||||
| Enemy Type | Unholy | |||
| Size | Gigantic (3) | |||
| Actions per round | ||||
| Stats | ||||
| Variation | Sodden Crew |
Sunken Crew |
Drowned Crew | |
| HP | 100 | 150 | 205 | |
| HP (Stygian/Bloodmoon) | 120 | 180 | 246 | |
| Dodge | 0% | 8.75% | 22.5% | |
| Protection | 0% | 0% | 0% | |
| Speed | 3 | 4 | 5 | |
| None | None | None | ||
| Resistances | ||||
| 50% | 70% | 95% | ||
| 20% | 40% | 65% | ||
| 60% | 80% | 105% | ||
| 20% | 40% | 65% | ||
| 200% | 220% | 245% | ||
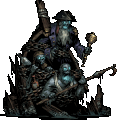
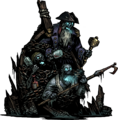
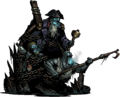
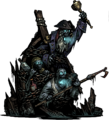
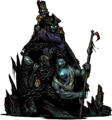
The Sodden/Sunken/Drowned Crew is a boss that appears in the Cove.
The Crew are a group of three undead smugglers chained to the wrecked ship aboard which they drowned. Although they may appear to be individuals, the Crew are mechanically a single-target entity filling three consecutive ranks in battle. The Drowned Anchorman is not part of the larger group, and has his own HP, resistances, and set of abilities.
Ancestor's Memoirs: The Drowned Crew
| “ |
Prying eyes had become a nuisance along the old road, and so I undertook to receive my most curious deliveries by way of marine shipments. A sheltered jetty was accessible by a narrow stone stair off the back of the manor, and a discreet system of pulleys could hoist even the heaviest prizes up the rock face from a securely tied dinghy below. I employed a crew of particularly unsavory mariners, who for a time sailed the four corners at my behest, retrieving many valuable artifacts, relics and rare texts. Predictably, they increased their tariffs to counter my intense stipulations of secrecy. Such resources had long been exhausted, of course, and so I prepared an alternative payment. While the greedy dogs slept off their revelry, I hexed their anchor with every twisted incantation I could muster, imbuing it with the weight of my ambition and my contempt for their crude extortion. At the witching hour, the anchor pulled with preternatural force, dragging craft and crew down into the depths. They must have cried out, but no sound escaped the swirling black waters.
|
„ |
| ~ The Ancestor |
Behavior
The Crew will start the battle with "All Hands On Deck!", which moves a hero to rank 1 and summons a Drowned Anchorman, The Anchorman will then immobilize the hero in rank 1. While the hero who is immobilized is free to attack, their Stress will increase rapidly over time, and the Crew will heal whenever anyone takes an action. If the targeted hero is virtuous, however, they will refuse to be anchored and stress heal the rest of the party.
The Crew will always start the round with "All Hands on Deck!" unless a hero is immobilized.
Any hero immobilized by the Drowned Anchorman can only be released by either killing the Anchorman, or automatically when the hero's stress reaches 100 or 200. Take note that if you retreat while a hero is immobilized by the Anchorman, they will not retreat with the party and will count as having died.
Strategy
The Crew itself has very low defensive stats with low Dodge, low Blight resist, and no Prot. Furthermore, it has 2 actions, making Blight highly effective. The crew takes up three ranks, meaning every hero is able to target it in some way. The Crew's attacks aren't particularly threatening. "Mutiny" and "Drink with the Dead" deal no damage, the latter however, deals 10 Stress damage. "Boarding Clutch" Is the main damaging skill the Crew has at their disposal, it does low on-hit damage and applies Bleed.
The main thing you need to plan around is the Anchorman, as it will immobilize whichever hero is in the front and, as previously mentioned, deal continuous stress damage to that hero. When the Anchorman is summoned it will have a +50% buff to PROT, Bleed and Blight Resist, and a +25% buff to Stun Resist. In addition to this, once the Anchorman immobilizes a hero it will transfer this buff to the Crew. Keep in mind that the crew will heal after each turn while under the effects of this buff. Having a team composition with highly flexible positioning is integral due to how often your party will be shuffled. The main threat of the fight is your heroes Afflicting, therefore, it is necessary to neutralize the Anchorman as soon as possible. Leaving a hero immobilized for too long can completely reset the fight due to the Crew's healing.
There are two main ways to deal with the Anchorman:
- Stuns. Having high base chance Stuns is excellent for this fight as it allows you to take an additional turn without worrying about a hero being Anchored.
- Rank 1 burst damage. Having a way to deal large amounts of damage to the Anchorman allows you to prevent the crew from healing too much by quickly dispatching the Anchorman. It is also possible to kill the Anchorman before it can take a turn, but this may be harder to do on higher difficulties due to the higher health pool.
Generally, you want to dispose of the Anchorman as quickly as possible, preferably via Stuns, while putting damage into the Crew with your damage dealers. If done properly, the threat of the Anchorman is largely mitigated, allowing you to focus all of your damage on the Crew. If the Anchorman does immobilize a hero, however, shift your focus to killing it as quickly as possible. Attempting to deal damage to the Crew while it is buffed will likely end in failure. Having a combination of Stuns and high damage is integral to winning this fight.
Notes:
- When a hero is anchored by the Anchorman, Stunning the Anchorman will NOT release the hero.
- The Anchor skill ("Heave to!") can be dodged.
- While it is technically possible to negate the risk of "Heave to!" via Virtues, this approach is not recommended as it would require making use of trinkets/quirks that increase Virtue chance on a chosen hero. This strategy is inconsistent, as you are not guaranteed to attain a Virtue upon reaching 100 Stress, even with trinkets, and the crew is likely to target other heroes with its pull move.
Team Selection
Recommended Heroes
- Abomination - Depending on what the team needs more, you can either Transform for massive damage with "Rage", or use "Manacles" in combination with a Stun chance trinket such as Broken Key or Padlock of Transference to stall the Anchorman. The Abomination is vulnerable to getting pulled when going for "Manacles", but he can still change gears to deal damage very quickly. Be mindful of the team around him, as he needs to be in rank 1/2 to deal damage in beast form, making him a poor fit with other heroes that need to sit in rank 1/2.
- Bounty Hunter - Huge burst damage to the Crew with Mark and decent on-hit damage against the Anchorman. His main advantage is his Camp skill "Planned Takedown", which gives him a damage boost against the Crew. He is also very flexible with positioning, as he can work from ranks 1-3.
- Crusader - His combination of Stun, Health/Stress heals, and movement is very useful for this fight. Holy Lance allows the Crusader to fix positions at the end of the turn while also dealing good damage to the Crew.
- Grave Robber - Huge amounts of burst damage to both the Anchorman and the Crew with the "Shadow Fade" and "Lunge" combo. She can also help mitigate the threat of the Pull by using "Shadow Fade" to fix positions.
- Highwayman - Offers great position control with "Duelist's Advance" and can potentially one-shot the Anchorman with "Point Blank Shot". He can also debuff Bleed resistance with "Open Vein", allowing for synergy with the Flagellant.
- Houndmaster - Can either set up Mark for another hero or use it himself in tandem with his Dog Treats to deal solid damage to the Crew. Blackjack also helps to Stun the Anchorman as long as the Houndmaster is in rank 1/2. Keep in mind that he cannot use his main damage ability "Hound's Rush" in rank 1.
- Jester - The fight is often not long enough to get a fully powered "Finale", but the offensive boost "Battle Ballad" provides is always welcome. If he does get pulled, he can use "Finale" early to deal decent damage to the Crew while also moving himself back. The debuffs "Finale" applies to the Jester aren't particularly dangerous, since the Crew has low offensive power.
- Occultist - Has the best Stun to deal with the Anchorman in "Hands from the Abyss". He can often win the fight by himself by Stunning the Anchorman twice in a row due to his incredible Trinket Support with Demon's Cauldron. Furthermore, he can also Mark the Crew to set up his teammates' damage. The Pulls aren't as problematic for him, as he only loses his Stun when in the backline.
- Plague Doctor - Can't do much against the Anchorman in terms of Stunning, but she has very good damage output against the Crew due to its low Blight Resist and two actions per Turn.
- Shieldbreaker - Provides excellent position control while also having good damage with Adder's Kiss and Pierce. Keep in mind that, upon resting at camp, her nightmare will inflict heavy stress on her if you have not yet cleared all seven of them
Reasonable Choices
- Arbalest - Very good damage against the Crew when considering the bonus damage to Marked enemies with "Sniper Shot". She is, however, reliant on remaining in the backline.
- Hellion - While she can deal good damage against Unholy enemies with trinket support, she offers less utility and rank flexibility than the Crusader, as she is dependent on being in the frontline. Her Bleeds are also less effective in the cove without the assistance of trinkets or other heroes with Bleed resist debuffs, such as the Flagellant.
- Flagellant - Despite the high Bleed resist present in the Cove, the debuff to Bleed resistance applied by "Punish" and "Rain of Sorrows" allows the Flagellant to Bleed the Crew and enemies in the Cove with a little effort. This extra DoT against the Crew may prove useful, considering their two actions per turn.
- Leper - Massive damage with Revenge set up. Can often take away more than half of the Crew's Health with one Crit. Despite this, he is reliant on remaining in the frontline to deal damage, making him ineffective if he is moved to the backline.
Discouraged Heroes
- Vestal - Average Stun without trinket support and largely useless when Pulled. Her healing isn't very important for this fight, as the Crew deals very little damage.
- Antiquarian - While she can deal Blight damage with "Festering Vapours" and lower the Crew's Accuracy with "Flashpowder", her low health and damage makes her a poor choice for this fight.
Trophy
After completing the Drowned Crew's champion quest, the captain will drop his bell as a Trophy.
| Crew's Bell |

|
|
Abilities
| Veteran Level | |||||||||
|---|---|---|---|---|---|---|---|---|---|
| Skill Name | Range | Rank | Target | Accuracy | Crit Chance |
Damage | Effect (Target) |
Effect (Self) |
Notes |
| All Hands on Deck! | Melee | 1, 2, 3, 4. | 2, 3, 4. | 108.75% | 0% | 0 | No Effect | ||
| Mutiny | Ranged | 1, 2, 3, 4. | 2, 3, 4. | 88.75% | 0% | 1-2 | No Effect | ||
| Drink with the Dead | Ranged | 1, 2, 3, 4. | 2, 3, 4. | 88.75% | 0% | 1-2 | No Effect | ||
| Boarding Clutch | Ranged | 1, 2, 3, 4. | 1, 2, 3, 4. | 88.75% | 6% | 4-9 | No Effect | ||
| Champion Level | |||||||||
|---|---|---|---|---|---|---|---|---|---|
| Skill Name | Range | Rank | Target | Accuracy | Crit Chance |
Damage | Effect (Target) |
Effect (Self) |
Notes |
| All Hands on Deck! | Melee | 1, 2, 3, 4. | 2, 3, 4. | 122.5% | 0% | 0 | No Effect | ||
| Mutiny | Ranged | 1, 2, 3, 4. | 2, 3, 4. | 102.5% | 0% | 1-3 | No Effect | ||
| Drink with the Dead | Ranged | 1, 2, 3, 4. | 2, 3, 4. | 102.5% | 0% | 1-3 | No Effect | ||
| Boarding Clutch | Ranged | 1, 2, 3, 4. | 1, 2, 3, 4. | 102.5% | 7% | 7-13 | No Effect | ||
Related Enemies
Cove: The Pelagics
Cove: The Drowned
Bosses
Gallery
Drowned Crew's combat animation
Drink with the Dead
Boarding Clutch
All Hands on Deck!/Mutiny
Defending


Trivia
- Prior to build 24121, the Crew's move resistances were 100/120/145% respectively. As neither the Crew nor the Anchorman had means to move back into position, shuffling either would put the Anchorman at the far back rank where he is unable to immobilize your heroes, thus bypassing the main gimmick of the fight. This tactic is no longer possible due to the crew having a much higher move resistance.
- The attack "Drink With The Dead" is a reference to the song "Drink With The Living Dead" by Ghoultown.