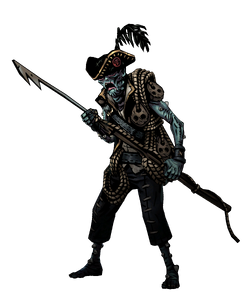
The Hull Keeper
| The Hull Keeper | |
|---|---|
 | |
| Stats | |
| 24 | |
| 5 | |
| 2 | |
| Resistances | |
| 50% | |
| 40% | |
| 30% | |
| 20% | |
| 10% | |
| 20% | |
| Low ▪ Medium ▪ High | |
| Other Attributes | |
| Types | Fisherfolk |
| Size | 1 |
| Turns per Round | 1 |
The Hull Keeper is an elite Fisherfolk enemy found in Darkest Dungeon II encountered only in The Shroud.
Description
The Hull Keeper is unique in that it is an elite enemy, replacing and upgrading the Bosun. It retains all of the regular Bosun's skills, however they are stronger, as well as having a unique move from Bosuns. Visually, it resembles a Bosun except for a vest and special hat.
Combat Skills
Strategy
The Hull Keeper is essentially a stronger version of the Bosun, and as you'd expect, it should be dealt with in the same way as a regular Bosun, albeit with more care for their higher damage and strength. Spearfishing and Heave Ho will deal hefty damage while disrupting your party, while Sodden Rigging, if the Hull Keeper strays to the middle of the enemy ranks, will inflict heavy damage to the player through debuffs and stress. Riptide, meanwhile, will help wreck your team through excess bleed and barnacle application, as well as synergizing well with his forced movement skills.
Having a party prepared for dancing around the ranks is helpful against Hull Keepers, although moving more may aggravate the Barnacles more than you can handle. Move Resist would, of course, be helpful against them, to protect against the Heave Ho! and Spearfishing disrupting your team. Moving it is valuable if you're scared of Sodden Rigging and Riptide, by dragging it to the first rank. However, this will force it to continually use Heave Ho!, so do with that what you will.
It's generally worth it to deal with the other enemies before the Hull Keeper, as the other enemies will irritate the natural disruption ability that Hull Keeper can inflict, as well as the Hull Keeper having two ![]() Death Armor tokens means, without a source of
Death Armor tokens means, without a source of ![]() Execution, it will take 2 instances of damage (either direct or DoT) after he enters
Execution, it will take 2 instances of damage (either direct or DoT) after he enters ![]() Death's Door in order to land a Deathblow. Clearing out the other enemies will generally leave the Hull Keeper defenseless.
Death's Door in order to land a Deathblow. Clearing out the other enemies will generally leave the Hull Keeper defenseless.
